| Installing the Software | |
|---|---|
|
ONYX allows you to set up multiple printing workstations. The network license must be installed on the License Server first, then install ONYX on additional workstations throughout the network.
The software box includes a USB flash drive and a hardware key. The USB flash drive contains the installation program. The hardware key is the license to run the software. If your purchase was an upgrade, a hardware key is not included; instead you will receive a key update link in an email. Run the key update before installing the software.
The license hardware key must be connected to the computer during the installation process and when the program is running.
1. Insert the license Hardware Key. The key drivers will be installed with the software.
2. Plug in the ONYX USB flash drive.
NOTE: Auto start may appear asking what you would like to do with the files. Click the folder icon to continue.
3. Open a file browser and go to the USB flash drive. Run [Install.exe].
4. Check the box to accept the [End User License Agreement (EULA)] and click [OK].
5. Click [OK ] to start the key driver install.
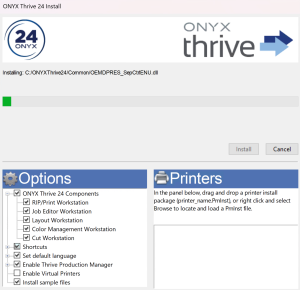
6. Optional - Change the path’s drive letter if you want to install ONYX on a different hard drive. Do not change the folder name. NOTE: Number of RIPs can be configured during a Thrive installation when using a network key. You can see how many are in use by other RIP-Queue workstations going to File > General Settings > Number of RIPs.
7. In the lower right, check a mark your printers. NOTE: If your printers are not listed you can download them using the Printer and Profile Download Manager. Printers can be installed after the software is installed (See Using the Printer and Profile Download Manager).
8. Click the [Install] button to begin. NOTE: When the program installer has finished, your web browser will open a message. This message mentions the user account you are logged into must be an administrator in order to access all functionality in ONYX.
[User Account Control (UAC)] should also be disabled. This will limit an administrator account and can affect the ONYX software. Consult with your IT department about turning this off.
9. Click [Finish] when the installation has completed.
RIP-Queue automatically launches and the printers will need to be configured. If printers were not installed at this point, a new printer install window appears (Figure 2).
After installation you will be prompted to register your product. Registration (The precise alignment of film or plates for printing. Register marks, usually placed outside the trim area, assist the printer and finisher in achieving accurate registration in multiple color jobs.) is done through your myonyx account and requires internet access. You will be prompted to register each time you open your product until registration is complete.
The following will be automatically transferred to the new install:
The following will not be imported from previous installations:
NOTE: Only settings from the most recent install will be imported.
|
|